Easy Halloween Nails You Can Do At Home!

I really wish I posted this post earlier because honestly I love all these nail ideas! If I’d done this earlier then I would have been able to do several of these before Halloween, I feel like it would be a bit strange if I did these after Halloween. Now I’m only going to have time to do one of these… so help me out and PLEASE comment which one I should do for Halloween, its too hard for me to decide!

black and white nails

I wouldn’t be able to do this but that’s just because I can’t even draw a moon on paper! Although if you can draw a moon and are looking for a subtle but Halloweeny look, then I suggest this! Simply get black nail polish, put a matt top coat and draw on the symbols above^. Like I said, it’s totally doable if you can draw.

halloween bloody nail  halloween mummy nails

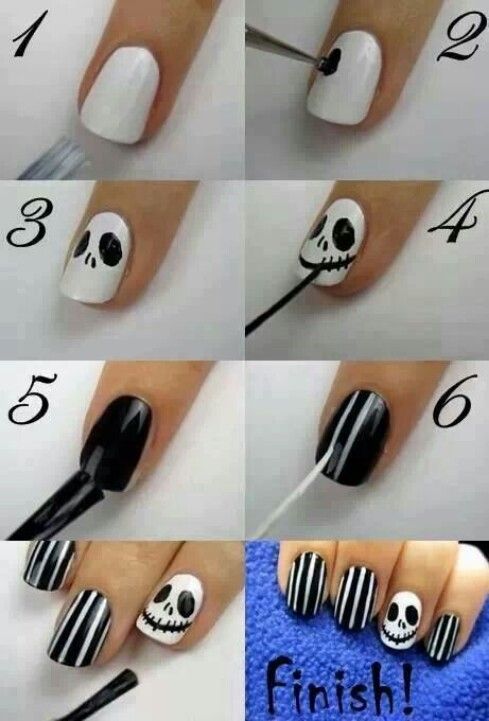
This seems much more intricate than it really is, what I really love about this is that its ok if not everything is perfect. You simply draw horizontal lines across you nail. Then to do the eyes, draw another vertical line and then using a dotter, make a big black circle. Once that dries, use your dotter again and make a white circle inside the black circle so that only the rim of the black circle is showing. The last step is to draw yet another black circle inside the white one, and that’s it!

halloween easy nail tutorialhalloween nail tutorial

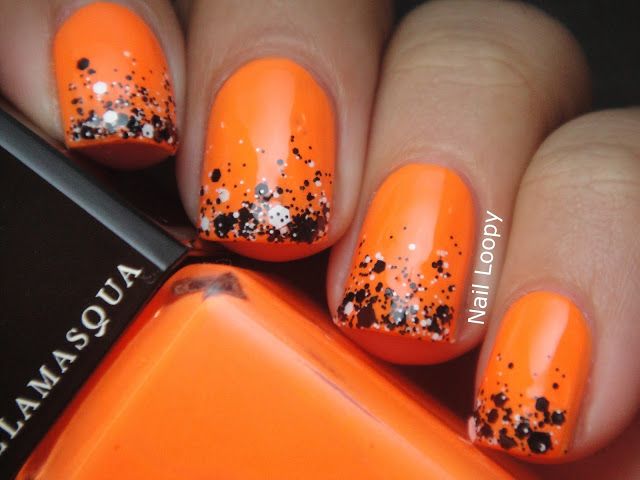
This one is so ridiculously simple but it looks so good! Choose a base coat (preferably orange since it is Halloween) and paint your whole nail. Then use a black and white glitter top coat on the tips of your nails. I actually have the perfect sparkle top coat for this, it looks exactly like the one above (I suspect it is actually the same one), it is called Black Tie Optional by Hard Candy and it only cost around $3!halloween nails easy halloween nails tutorial

Do you guys remember crackle? It was “the thing” about a year ago and now no one uses it anymore! Well if you are like me and never through out makeup until you finished it, then chances are you have a black crackle lying around somewhere! I find that the crackle looks perfect for Halloween, especially with orange as the base!halloween nails

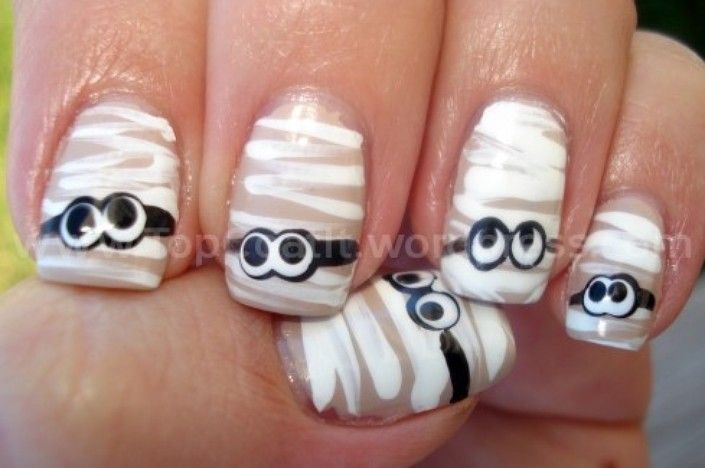
This one also seems way harder to do than it actually is. First paint your nail any base color. Then the one hard part comes next, making the head! To make a head draw a semi circle first then two triangles near the sides of your nail (it isn’t too hard if you section of your nail). Then draw to big ovals inside the head and a small white line. Voila!

For more great Halloween ideas look at my pinterest!

Previous posts:

October Wishlist

Heatless Curls, quick and easy!

2000 Follower Giveaway

From day to night outfit (ootd)

Worst Trends of the 21 Century

Fall Jacket Essentials

To see posts right when they come out and to see more photos follow: Instagram | Facebook | Twitter| Tumblr| Polyvore |Pinterest Also make sure to like, comment, and share, it means a lot!

kisses,
Kat

Treasured Polish Review (O.P.I)

This is going to be a quick post about a nail polish that I bought recently and have been loving lately!IMG_1181

It is the Nicole by O.P.I in the shade: back to reality… Tv

First off, isn’t that the cutest name!! Nail polishes always have adorable names but this one really made me smile because I thought it was soo funny…
Now to the releventt stuff:
I love the formula of this nail polish so much! It glides on easily and makes almost no bubbles, it also doesn’t make any lines from the bristles of the brush. Speaking of the brush, it is very thick and I personally like that but some may not as it is harder to do any detailed designs. This color is a beautiful pastel purple, if purple can be a pastel?! Although  you can put on several layers for a darker color. Below, there is an image of my nails after applying one coat of this color:

IMG_1183

If you would like to read a review on the topcoat I used press here. Or if you would like to buy it press here:Seche Vite Dry Fast Top Coat

Hope you enjoyed this quick post! If you would like to purchase the O.P.I color click the link below.
Nicole By OPI Nail Lacquer Polish, Back To Reality..TV #NI-K16. by OPI

Remember to follow via FB, Instagram, Twitter, anything you can think of! Username for everything is osovogue with the exception of instagram which is: o_so_vogue

Also make sure to like, comment, and share, it means a lot!

Love y’all,

xoxo

Kat

Disclaimer: There are affiliate links in this post but my thoughts are completely honest, otherwise I would not have made this post. I also purchased all the mentioned items with my own money. This is not a sponsored post.

Seche Vite Review (must-read!!)

IMG_1189 It was a holy day when I was in Winners looking for a new topcoat for nail-polish. Seche vite first caught my attention because it was in a box whereas all the other nail polishes were just freestanding. It was $7 and I was going to put it back (I know it’s a good price but there were other topcoats that cost less and I’m a money saver…) but then I realized that seche vite means dry quick in French. Since I never had a quick dry topcoat I decided to read what it said on the box. Here is a picture of what it said: IMG_1194 I am easily convinced to buy anything, really, if I watch any infomercial I will want to buy the object no matter how dumb or unuseful it may be. So this description instantly sold the product to me. And I must say that description has not let me down! This is a great product but as always there are some cons, here is a comparison:

Pro’s:

– It doesn’t smudge the layer of nail polish like some topcoats do – Your nail polish lasts 2-3 days longer

– Less chipping

– Makes your nail polish look like gel nail polish because of the thick layer of shine. Many people ask me if I’m wearing gel nail polish when I use this top coat.

Con’s: – Horrible stench, as soon as you open the nail polish you will smell are really horrible and strong scent. Since it is chemicals and probably a bit toxic, I suggesting applying this in an open area, or outside, not inside your bedroom.

-It may shrink some nail polish. On some occasions I noticed that after applying this topcoat my nail polish shrank a bit and you could see the tips of your fingernails. But the shrinkage is so minimal that you won’t notice unless you try finding it.

IMG_1198

Without Seche Vite

IMG_1185

With Seche Vite

In conclusion, this product always gets me many compliments and has a lot more pros than cons. The one thing I didn’t mention yet is whether it really is quick drying. I didn’t comment on it because I don’t think there is a sure way to tell but I do think that it helped the polish dry a bit quicker. Remember to follow via FB, Instagram, Twitter, anything you can think of! Username for everything is osovogue with the exception of instagram which is: o_so_vogue Also make sure to like, comment, and share, it means a lot! Here is the best price that I’ve found online so far: Seche Vite Dry Fast Top Coat

xoxo,

Kat

Disclaimer: There are affiliate links in this post but my thoughts are completely honest, otherwise I would not have made this post. I also purchased all the mentioned items with my own money. This is not a sponsored post.